MeshCore Chat – ein Desktop-Client für LoRa-Mesh-Netzwerke
Seit einigen Monaten schreibe ich an MeshCore Chat, einem Desktop-Client für MeshCore-Mesh-Funknetze. MeshCore ist eine Firmware für LoRa-Geräte, die Nachrichten über mehrere Hops durch ein selbstorganisierendes Funknetz weiterleitet – ohne Internet, ohne Provider, nur Funk.
Die offiziellen Apps für Handy und Browser sind gut, mir fehlte aber ein vollwertiges Programm für den Desktop, mit dem ich das Netz nicht nur benutzen, sondern auch beobachten und administrieren kann. Genau das ist MeshCore Chat geworden: eine Qt6-Anwendung in Python, die sich per serieller Verbindung oder Bluetooth LE mit dem LoRa-Gerät verbindet.
Was es kann
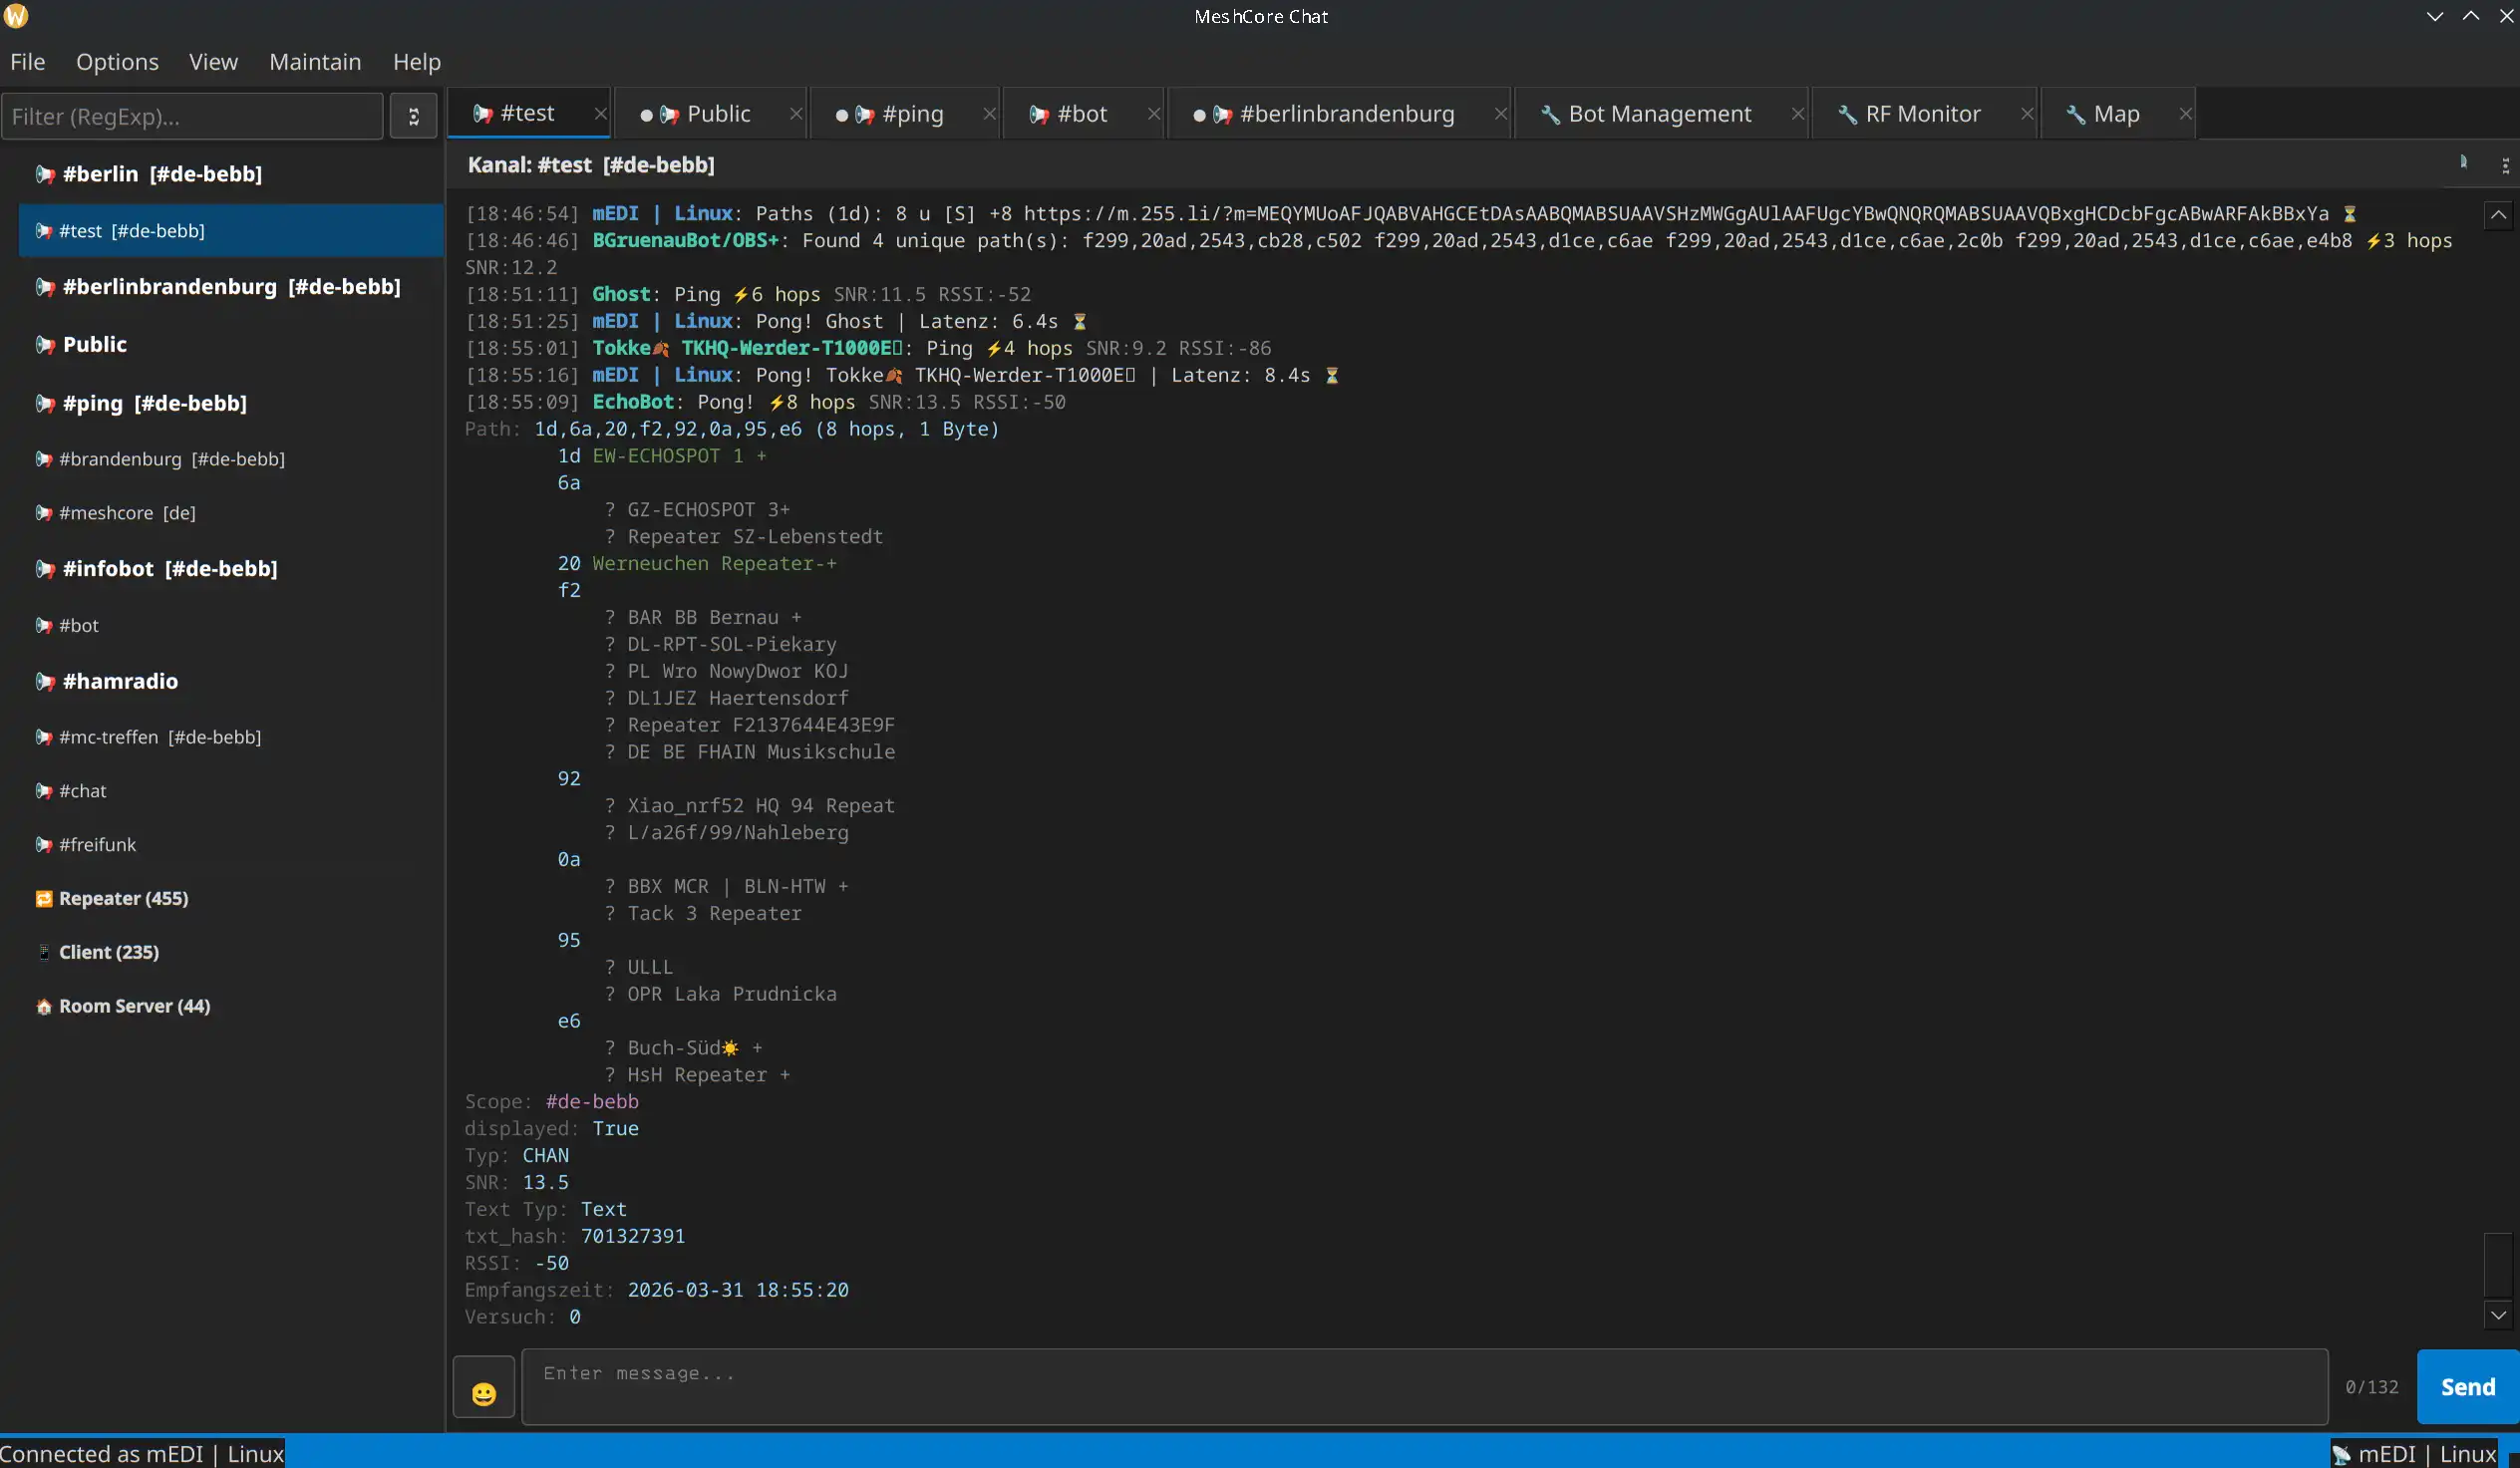
Chatten. Private Nachrichten und Kanäle, komplette Verlaufsspeicherung in SQLite, Kontaktverwaltung gruppiert nach Typ (Client, Repeater, Room Server, Sensor), Room-Server-Login mit gespeicherten Passwörtern.
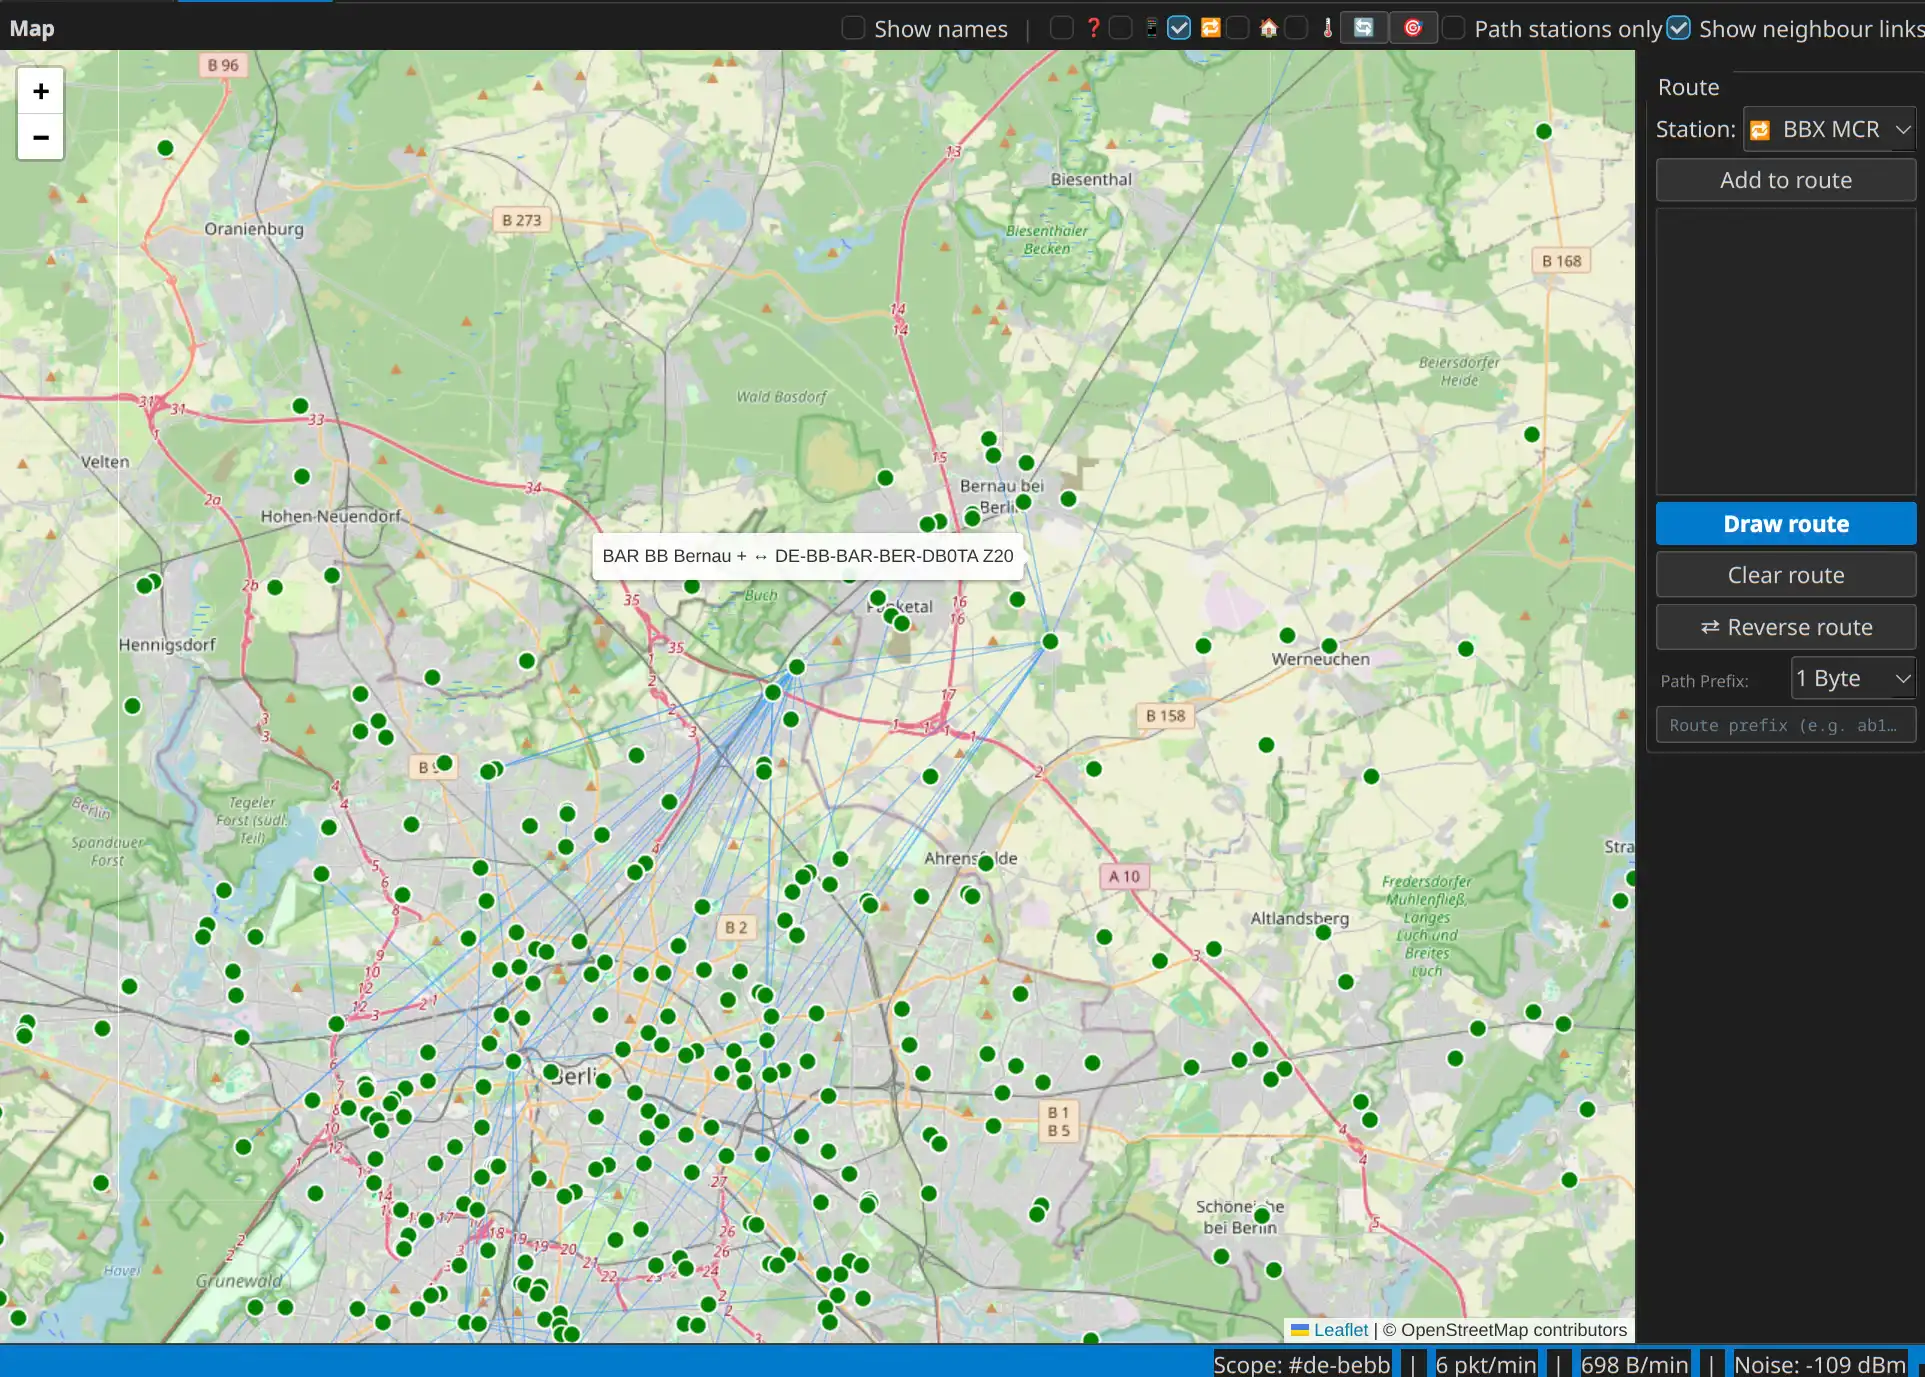
Karte. Alle Kontakte an ihrer letzten bekannten Position auf einer OpenStreetMap. Routen lassen sich einzeichnen, per Drag & Drop verschieben und an den passenden Repeater einschnappen. Ein Overlay zeigt den Nachbarschaftsgraphen des Funknetzes – also welche Repeater sich gegenseitig direkt hören. Diese Daten sammelt die App im Hintergrund aus Adverts, Traces und Repeater-Abfragen und benutzt sie, um mehrdeutige Pfad-Hashes aufzulösen. MeshCore überträgt pro Hop nämlich oft nur ein einzelnes Byte, und bei 254 möglichen Werten kollidieren zwei Repeater schneller als man denkt.
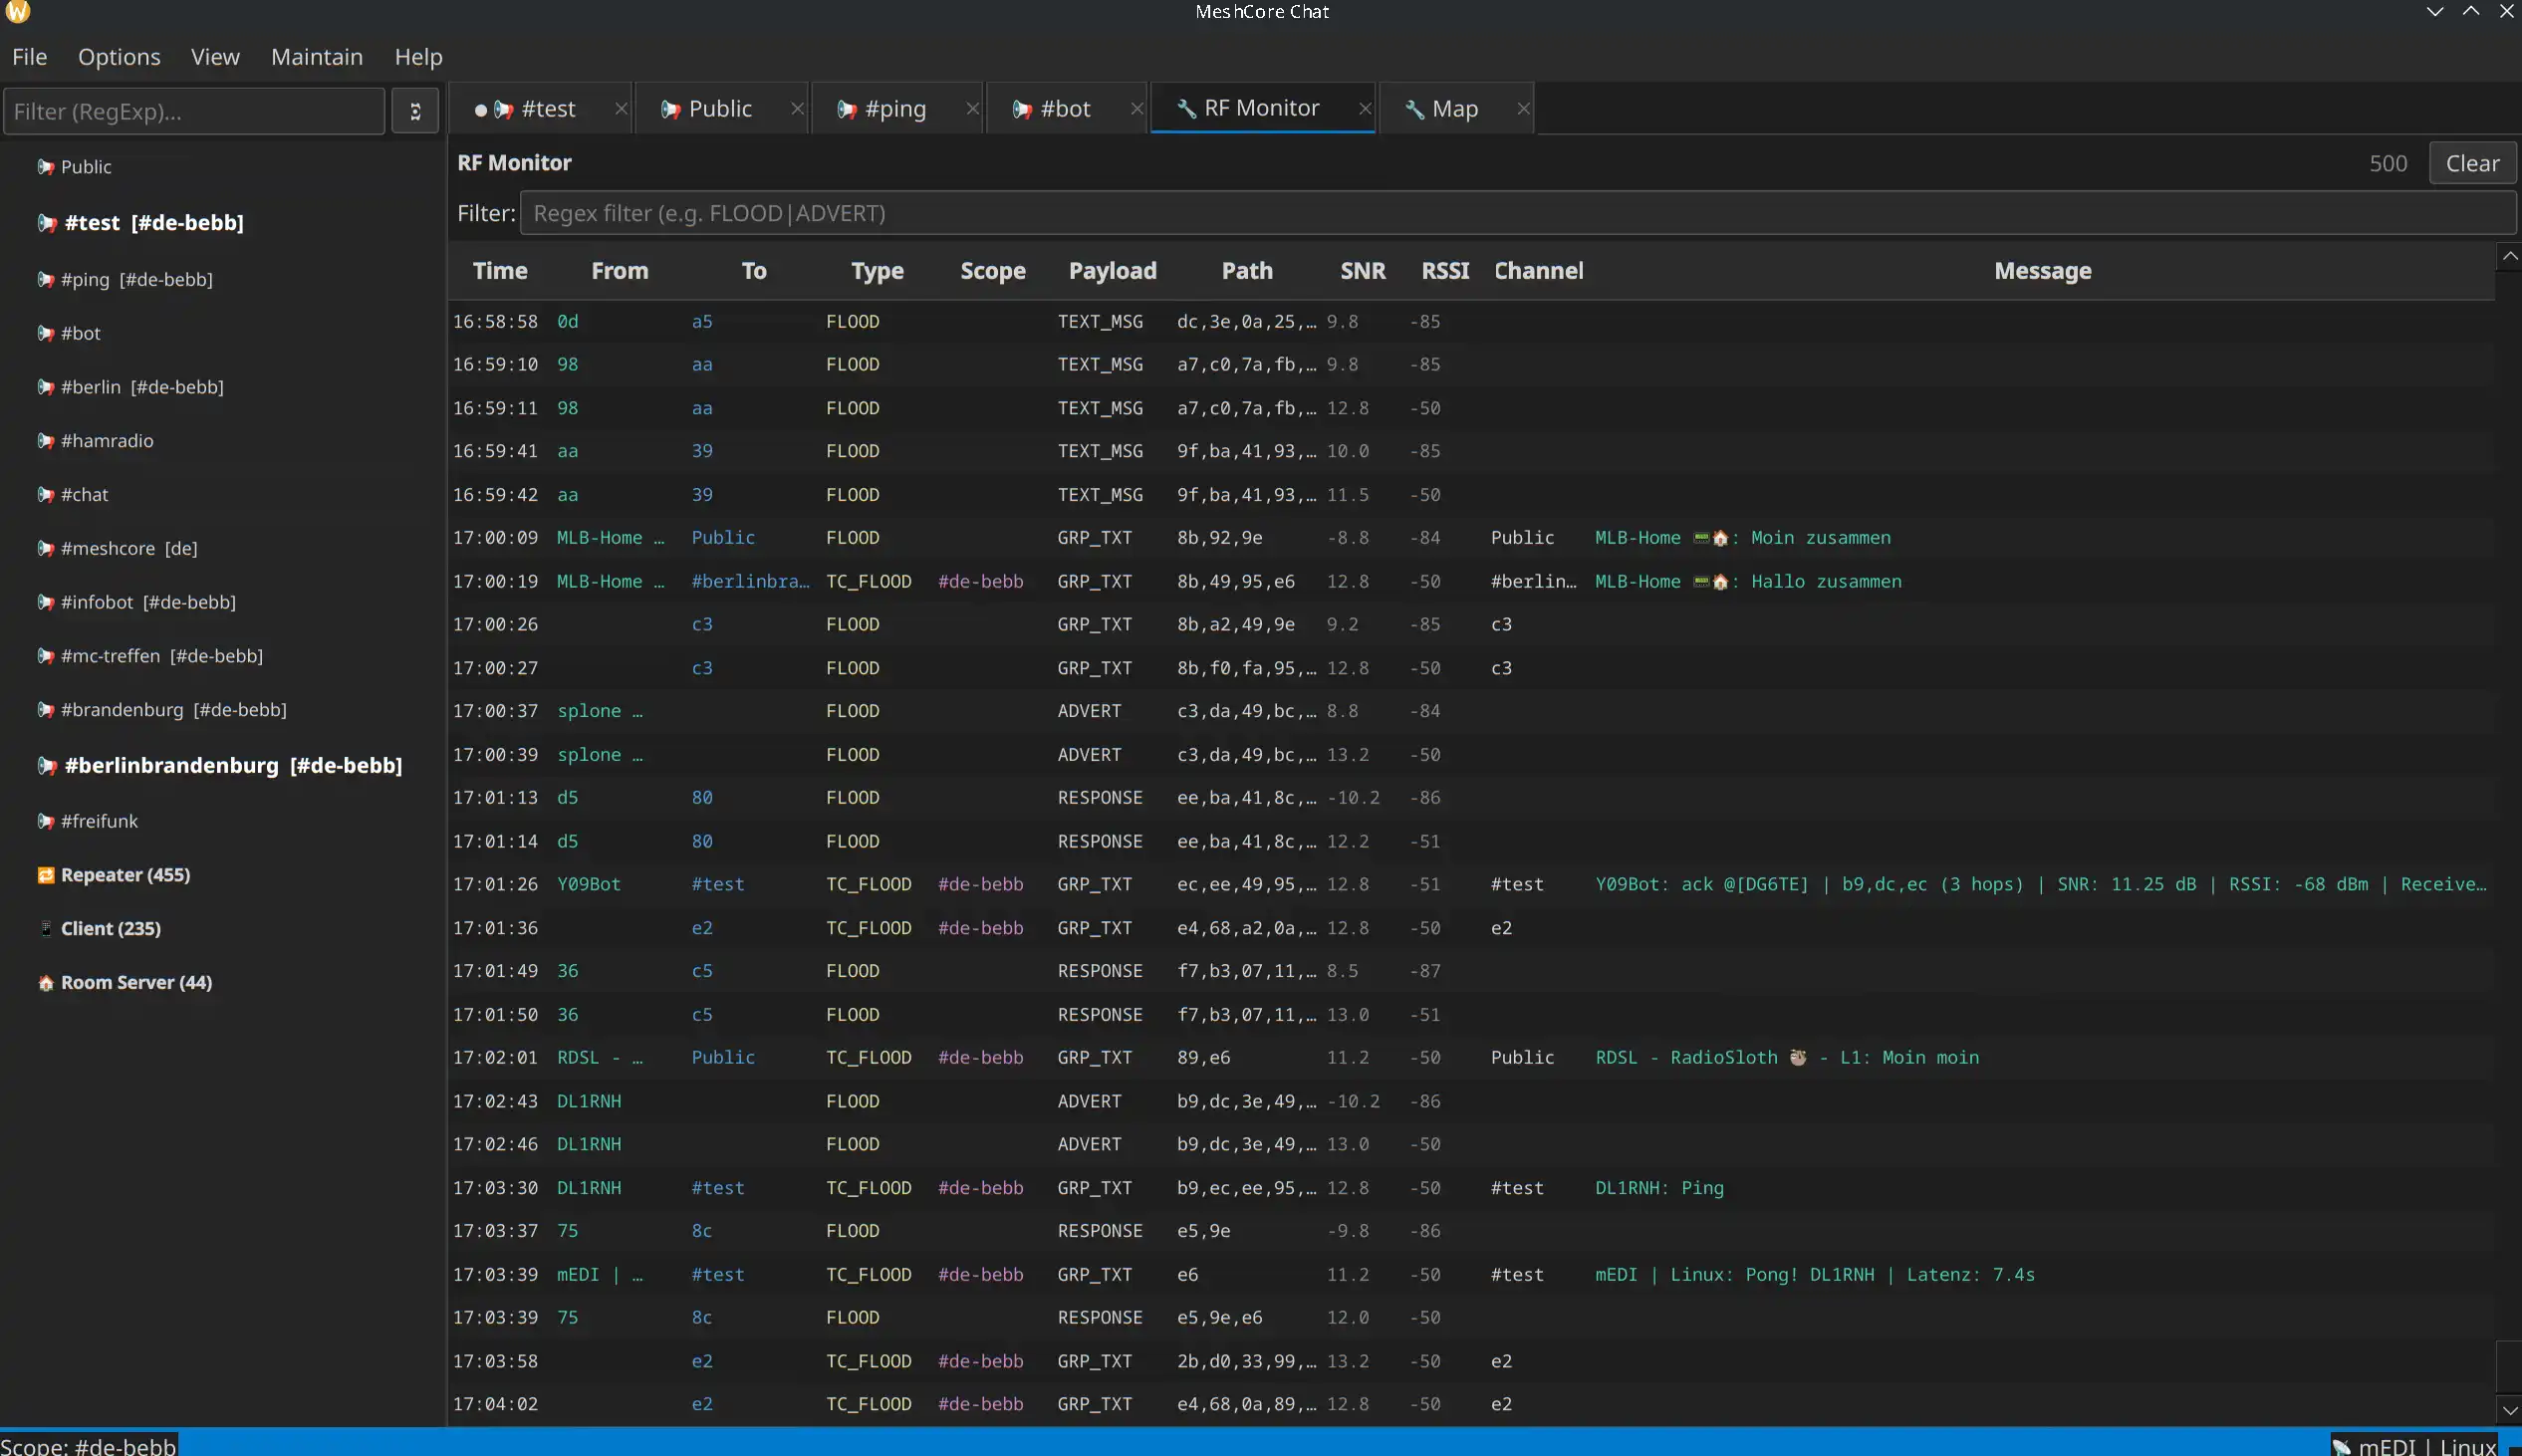
RF-Monitor. Ein Live-Sniffer für alles, was über die Antenne kommt: ADVERT, TRACE, PATH, GRP_TXT, ACK und mehr werden dekodiert und lesbar aufbereitet – auch dann, wenn die Firmware den Inhalt nicht entschlüsseln kann. Kanäle, deren Schlüssel bekannt ist, werden lokal entschlüsselt.
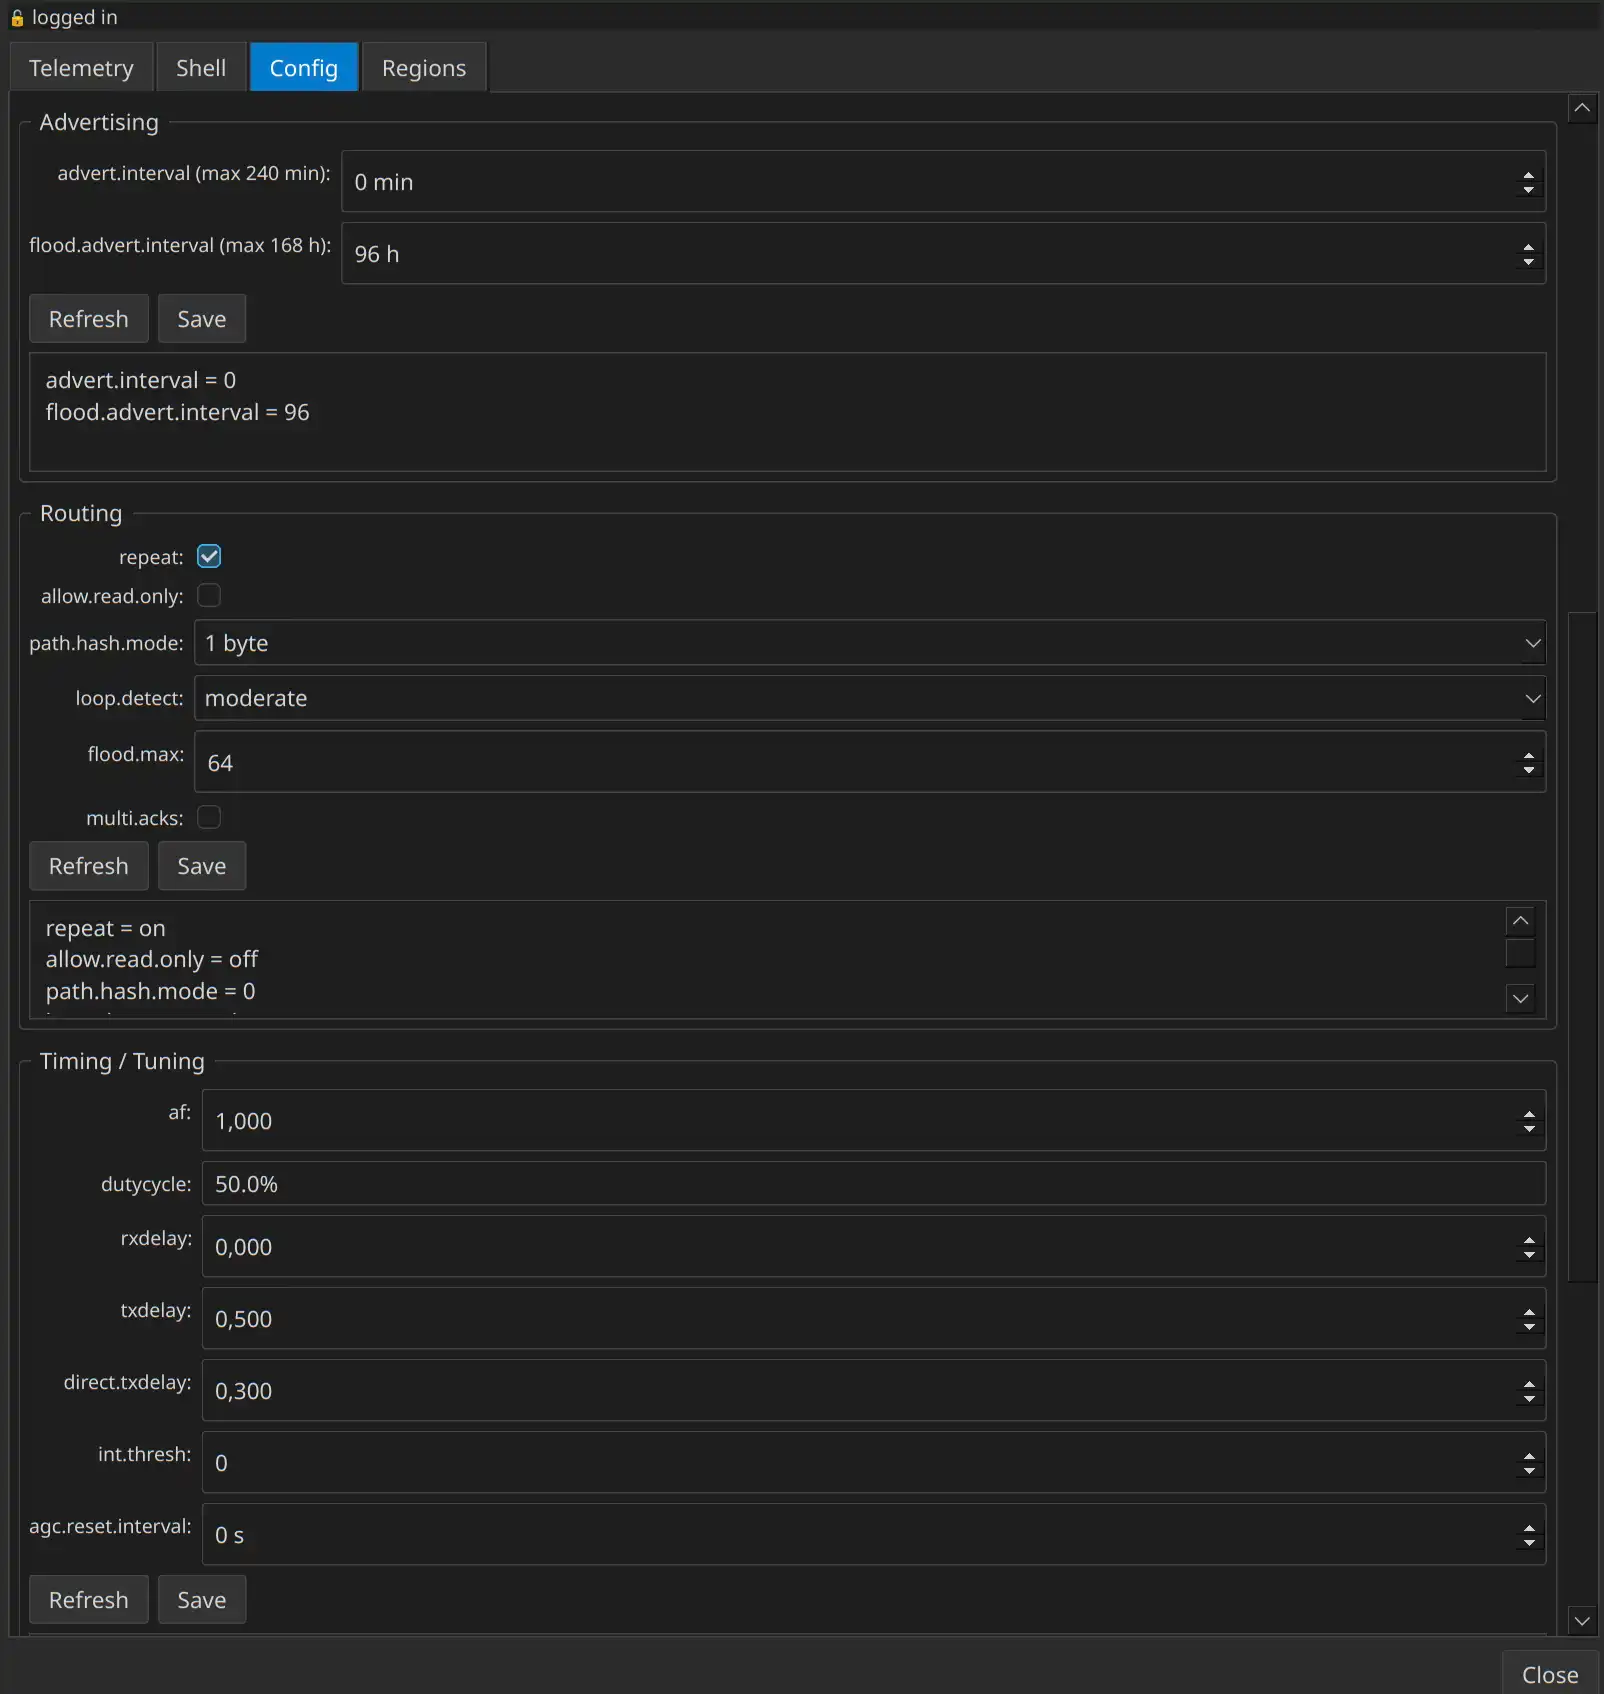
Admin. Repeater und Room Server lassen sich per Rechtsklick fernwarten: Telemetrie, eine Shell mit History und Kommandoreferenz, die komplette Konfiguration in Gruppen mit eigenen Refresh/Save-Buttons und eine interaktive Region-Verwaltung. Es wird bewusst nichts automatisch geladen – jede Abfrage kostet Funkzeit.
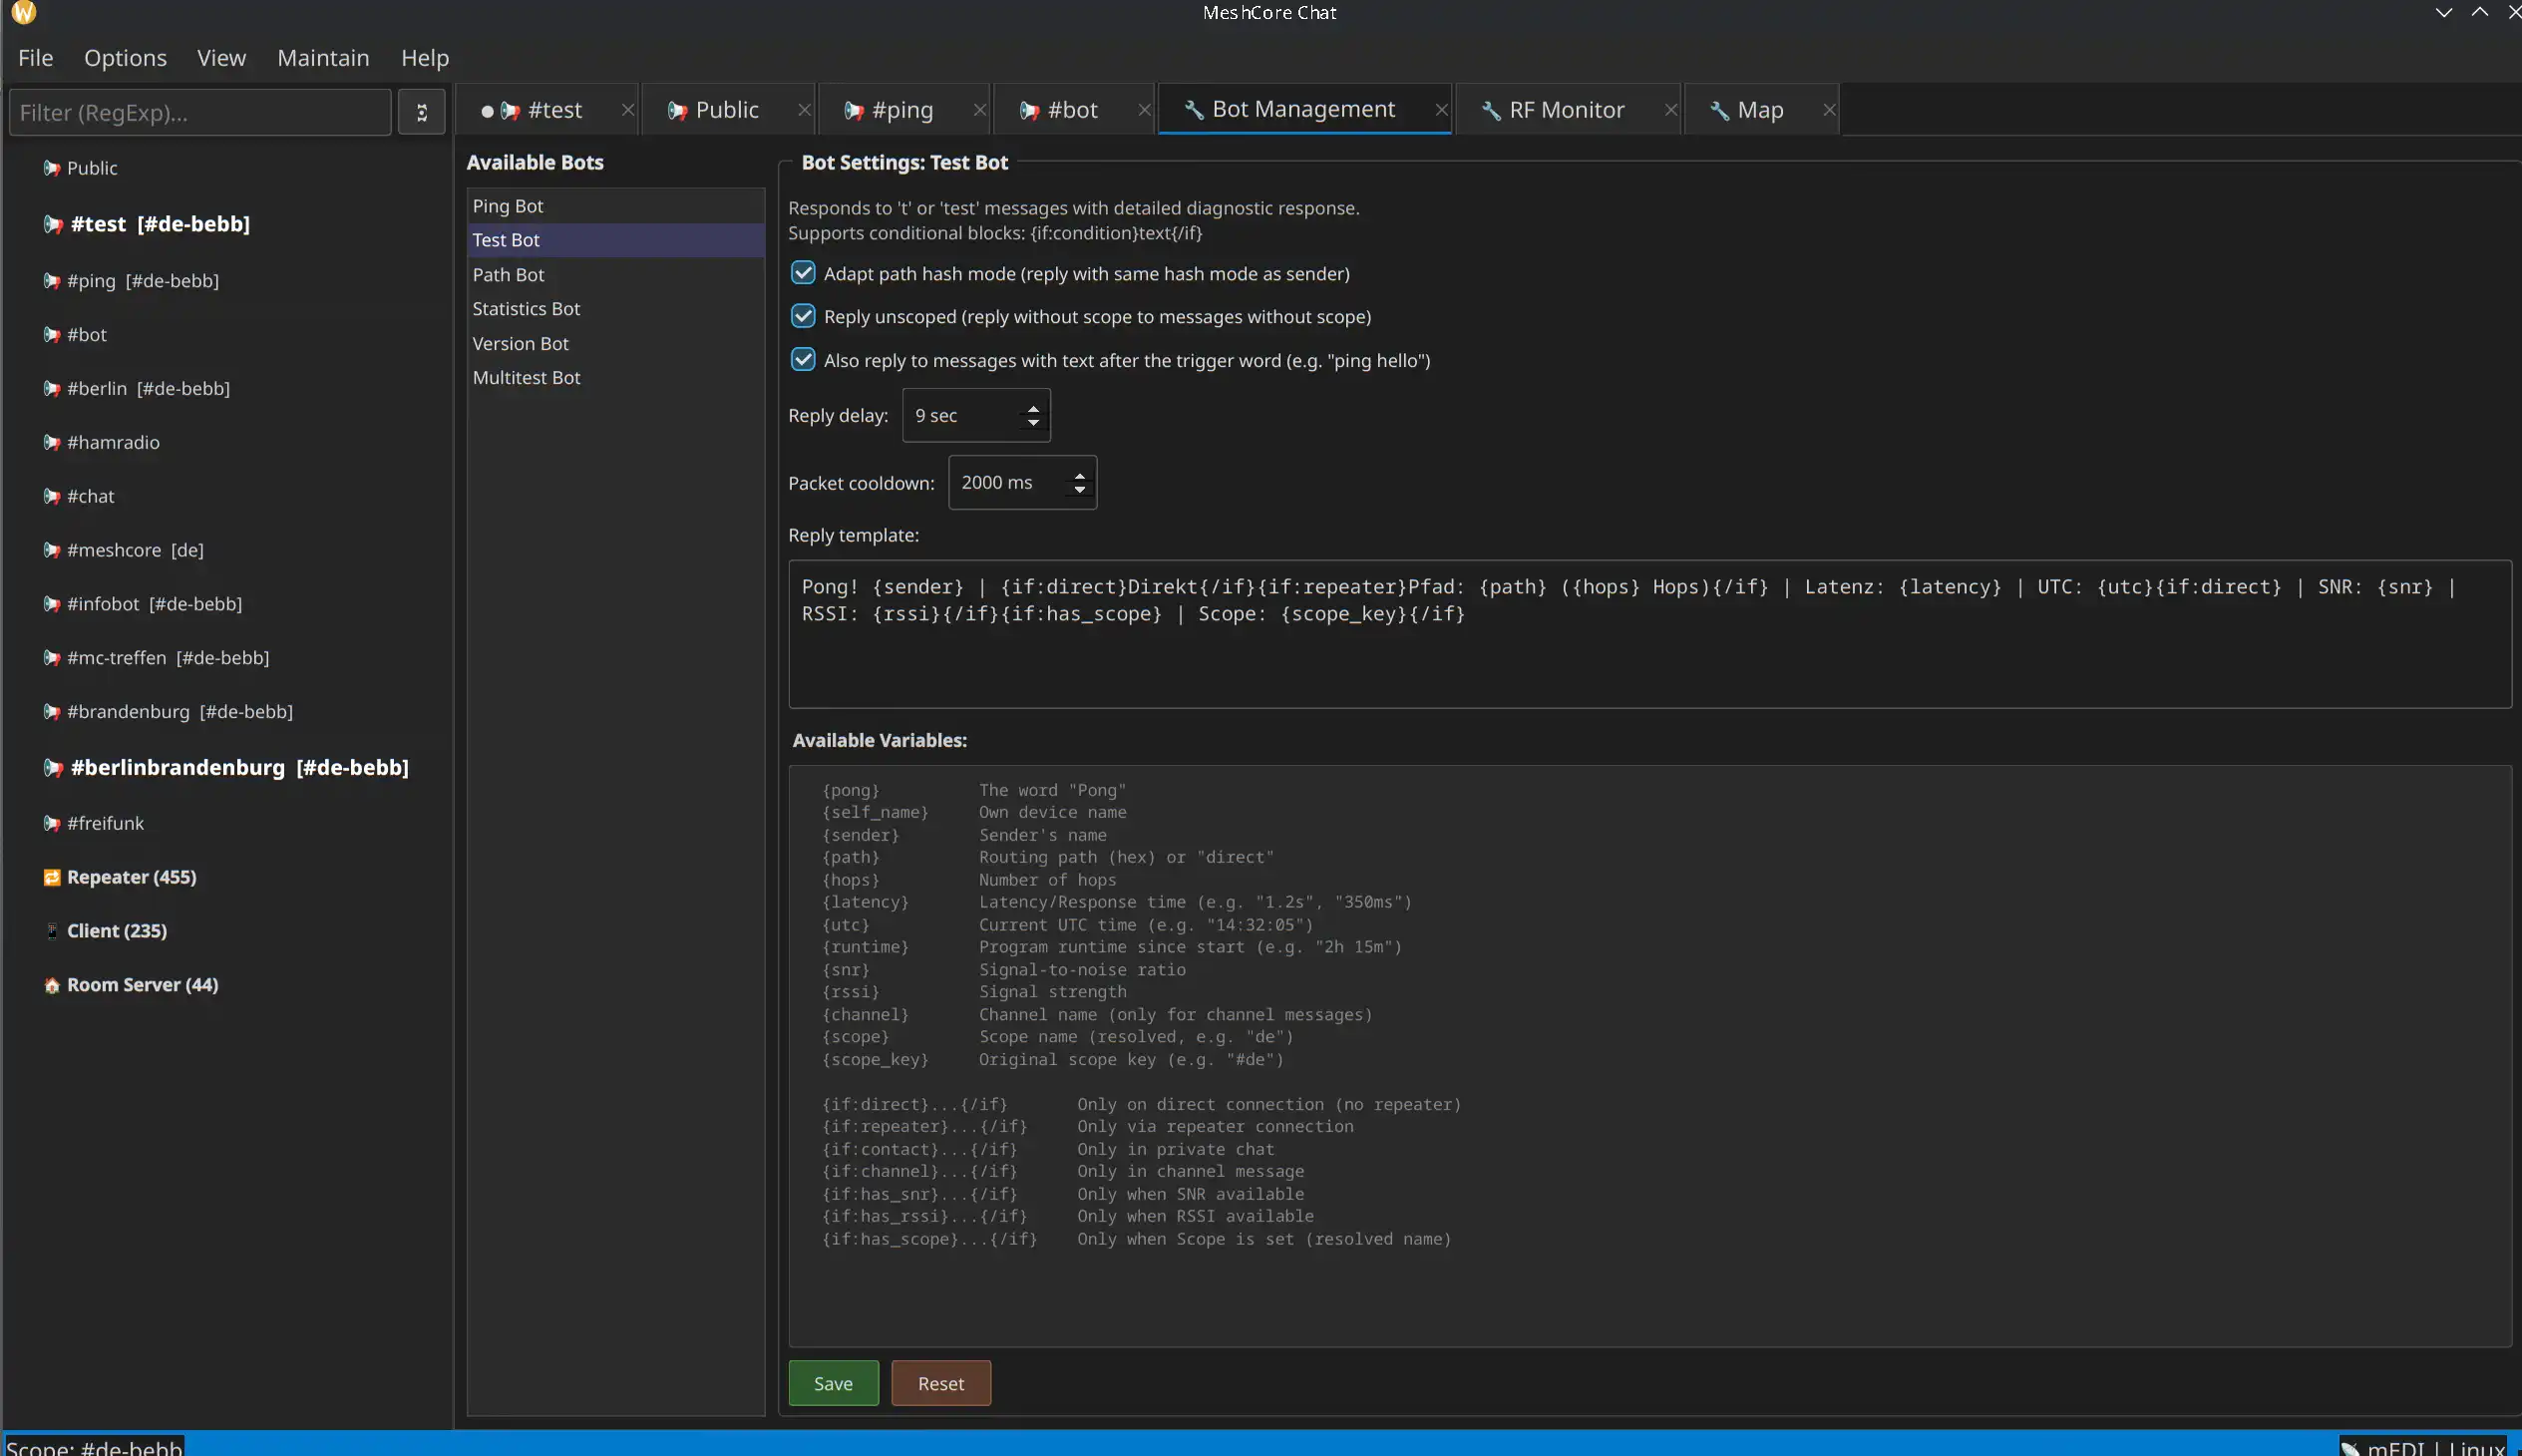
Bots. Neun eingebaute Bots (Ping, Test, Path, Stats, Version, Multitest, WhoIs, Help, PrefixFree) mit einem Template-System und über 150 Variablen. Die Antworten sind frei anpassbar und werden im Bot-Manager mit Live-Vorschau bearbeitet, inklusive Byte-Zähler für das 146-Byte-Budget einer Funknachricht.
Dazu kommen ein Headless-Modus für den Raspberry Pi (alle Bots, Statistiken und Datenbanken ohne Display), optionales MQTT-Sharing für Netzwerk-Analyzer und ein CLI-Tool zum Senden aus Skripten.
Screenshots
Chat mit Nachrichtendetails
Karte mit Nachbarschaftsverbindungen
RF-Monitor
Admin-Fenster: Repeater-Konfiguration
Bot-Verwaltung mit Live-Vorschau
Ausprobieren
Gebraucht werden Python 3.10+, Qt6 und ein MeshCore-fähiges LoRa-Gerät. Die Start-Skripte richten die virtuelle Umgebung beim ersten Aufruf selbst ein:
git clone https://codeberg.org/mEDI/meshcore_chat.git
cd meshcore_chat
./start.sh
Unter Windows entsprechend start.bat. Ein ./start.sh update zieht später neuen Code und aktualisiert die Abhängigkeiten in einem Schritt.
Die App ist bei Version 0.8.6 angekommen und läuft bei mir im Alltag stabil – ein Release-Kandidat ist sie damit trotzdem noch nicht. Über Rückmeldungen, Fehlerberichte und Mitentwickler freue ich mich.
Links
scx-tools / scx-scheds on Arch Linux: sched_ext schedulers in practice
Linux's default scheduler (CFS/EEVDF, depending on kernel version and configuration) is a strong general-purpose choice. Still, a single scheduler cannot be optimal for every workload: interactive desktops, low-latency audio, latency-sensitive gaming, build servers, and throughput-heavy batch systems often want different trade-offs.
The sched_ext framework (often referred to as SCX) changes the game: it allows you to run a scheduler implemented as an eBPF program. The scx-tools project ships tooling and reference schedulers; scx-scheds is commonly used to describe the set of sched_ext scheduler implementations you can run and experiment with.
This article focuses on Arch Linux: what you gain with SCX schedulers, what options exist, and how to install, configure, and enable them as a service.
Why use an SCX scheduler? (Benefits)
1) Workload-specific tuning without patching the kernel
With sched_ext, you can switch schedulers (or update them) without maintaining kernel patch sets. In many cases you can:
- keep your standard Arch kernel (as long as it supports sched_ext),
- install a userspace scheduler binary,
- enable/disable it like any other service.
2) Faster iteration and experimentation
Schedulers can be developed and tuned much faster than traditional in-kernel scheduling code. This makes SCX attractive for:
- desktop responsiveness experiments,
- new heuristics for heterogeneous CPUs,
- latency reduction under load,
- research and benchmarking.
3) Better latency / responsiveness for certain setups
Many users try SCX schedulers for perceptible improvements in:
- UI smoothness during compilation or heavy background tasks,
- gaming frame-time consistency under load,
- audio production (glitch resistance),
- interactive shells and editors.
Actual results vary by kernel, CPU topology, power settings, and the chosen scheduler.
4) Observability and control via eBPF
The eBPF ecosystem makes it practical to introspect behavior and iterate on policies. Some schedulers expose parameters, logging, or statistics that can be monitored.
What options do you have? (Schedulers and approaches)
There is no single “best” SCX scheduler. Instead, pick a policy that matches your goals.
Common categories
- Balanced / general-purpose: aims to be a drop-in alternative focused on smoothness while staying robust across workloads.
- Latency-focused: prioritizes interactive tasks and wake-up latencies, often at some throughput cost.
- Throughput / batch: focuses on maximizing overall throughput for build servers and compute-heavy workloads.
- Experimental / research: meant for exploration, not necessarily daily-driver stability.
A quick “which one should I try first?” guide
Use this as a starting point, not as a universal truth:
| Goal | What to try first | What to watch for |
|---|---|---|
| Daily-driver desktop smoothness | scx_rusty |
general stability under your typical workload |
| Desktop/gaming-oriented option | scx_bpfland |
frame-time consistency, input latency, and overall stability |
| Lower latency under load | scx_lavd (if available) |
potential throughput trade-offs |
| Testing / understanding basics | scx_simple / reference schedulers |
mostly for experimentation, not necessarily optimal |
Examples you will likely encounter
Depending on your installed package version, binaries may include schedulers such as:
scx_rusty(often considered a good “daily driver” starting point)scx_lavd(commonly discussed for latency-focused behavior)scx_simple(often used for testing, debugging, or as references)
If your build includes scx_bpfland, it is often positioned as a desktop/gaming-oriented option. Treat it like any other scheduler: validate stability and benchmark on your own hardware.
Names and available schedulers differ by release. On your system, list what is installed:
ls -1 /usr/bin/scx_* 2>/dev/null
# or with scx-tools installed
scxctl list
If you see a loader or manager tool in your package (some releases include helpers), prefer that for starting/stopping schedulers. Otherwise, you can run a scheduler binary directly.
Prerequisites on Arch Linux
1) Kernel support for sched_ext
You need a kernel that includes sched_ext and has it enabled.
In practice, this usually means running a recent Arch kernel (or an alternative kernel package) that includes sched_ext. If sched_ext is missing, installing newer kernels (or trying an alternative kernel flavour) is the first step.
Quick checks:
uname -r
If CONFIG_IKCONFIG_PROC is enabled, you can check the running kernel config:
zgrep -E 'CONFIG_SCHED_CLASS_EXT|CONFIG_SCHED_EXT' /proc/config.gz
If that file does not exist on your system, check your kernel’s config in /usr/lib/modules/$(uname -r)/build/.config (if available) or consult the kernel package documentation.
2) eBPF capabilities
Schedulers typically need elevated privileges to load eBPF programs. Expect to run them as root via systemd.
3) Keep a fallback plan
If you are experimenting on a production machine, have a way to revert quickly:
- keep SSH access,
- keep a known-good kernel in the bootloader,
- know how to disable the service from a TTY.
Installation on Arch Linux
Option A: Install from official repos (if available)
Package availability changes over time. Start by searching:
pacman -Ss scx
If you find scx-tools / scx-scheds packages in your configured repositories, install them with pacman -S ….
Option B: Install from the AUR
If packages are not in the official repos, they are commonly provided via the AUR (often as -git variants).
Example using an AUR helper:
yay -S scx-tools-git scx-scheds-git
If you do not use an AUR helper, build using makepkg in the usual Arch way.
If you build from source, expect typical eBPF build dependencies (compiler toolchain and libbpf-related components). Package recipes usually document the exact list for Arch.
Verify installation
command -v scx_rusty || true
ls -1 /usr/bin/scx_* 2>/dev/null
Configuration and setup
SCX schedulers usually accept command-line flags for tuning. Because these flags can change by version, always consult the built-in help:
scx_rusty --help
A practical approach: start with defaults
1) Start one scheduler manually (root):
sudo scx_rusty
2) Use your system normally for a while (desktop use, compile something, game, etc.).
3) If it feels good and stable, move to a systemd service.
Tuning
Schedulers differ in what they expose:
- latency/throughput knobs
- CPU selection, NUMA or SMT considerations
- logging/telemetry levels
Treat tuning like performance engineering:
- change one setting at a time,
- benchmark under repeatable conditions,
- keep notes of kernel version, microcode, power governor, and BIOS settings.
Enable as a systemd service (recommended)
The cleanest method on Arch is a dedicated service that starts your chosen scheduler at boot.
Option A: Use scx_loader.service (preferred when available)
Many Arch packages ship scx-loader, a small manager that starts the configured sched_ext scheduler for you. When present, it is usually the easiest and most maintainable approach.
1) Understand the configuration search order
scx_loader typically looks for a configuration file in the following locations (first match wins):
/etc/scx_loader/config.toml/etc/scx_loader.toml/usr/share/scx_loader/config.toml/usr/share/scx_loader.toml
On Arch, a vendor example (or an empty placeholder) is often installed under /usr/share/scx_loader/. Do not edit vendor files; create your own config under /etc/.
Useful command:
# Find packaged examples and paths
pacman -Ql scx-tools | grep -E 'scx_loader|config\.toml'
2) Create a minimal config
Create /etc/scx_loader/config.toml and start with a conservative scheduler choice. The exact schema can change; always verify against upstream documentation.
Upstream configuration reference:
- https://github.com/sched-ext/scx-loader/blob/main/crates/scx_loader/configuration.md
3) Start and enable the service
sudo systemctl enable --now scx_loader.service
4) Verify status and logs
systemctl status scx_loader.service
journalctl -u scx_loader.service -b
5) Disable (fallback)
sudo systemctl disable --now scx_loader.service
Option B: Run a scheduler binary directly (simple but less flexible)
If you do not have scx_loader, you can create a small systemd unit that runs a scheduler binary (for example, scx_rusty) with your desired flags.
For general systemd background on Arch, see:
- https://wiki.archlinux.org/title/systemd
Benchmarking: how to measure improvements
Scheduler changes can improve “feel” (responsiveness) while leaving traditional throughput benchmarks unchanged—or vice versa. Use a mix of metrics.
Recommended tools
- schbench (scheduler benchmark focused on latency)
- stress-ng (load generation, includes latency-related tests)
- perf and bpftrace (observability)
- Phoronix Test Suite (repeatable macro benchmarks)
Examples:
# Example: install benchmarking tools
sudo pacman -S --needed perf stress-ng
If schbench is not packaged in your repos, look for it in the AUR.
A simple methodology
1) Pick a baseline (default scheduler; disable SCX service). 2) Run 3–5 iterations of your chosen tests. 3) Enable the SCX scheduler. 4) Repeat the same tests. 5) Compare medians (not best runs).
What to watch
- frame-time consistency (for games)
- audio XRUNs/glitches (for pro audio)
- wake-up latency and tail latencies under load
- compile time vs interactive responsiveness trade-off
Troubleshooting
Service fails to start
- Check
journalctl -u scx_loader.service -bfor verifier errors or missing capabilities. - Verify you are running a kernel with sched_ext support.
- Remove systemd hardening temporarily to rule out permission issues.
System feels worse
- Switch back to the default scheduler (stop the service).
- Try a different SCX scheduler (balanced vs latency-focused).
- Re-test with CPU governor settings fixed (e.g., avoid mixed power profiles during benchmarking).
External links (docs, code, discussion, and benchmarks)
- sched_ext / SCX upstream project (code and documentation):
- scx-tools (repository entry points and tooling live in the same upstream org):
- Arch Wiki (systemd basics and service management):
- Linux kernel scheduler documentation (general background):
- eBPF documentation (background and tooling):
- Benchmarking and comparisons (independent sources):
- Community discussion and background (useful for understanding trade-offs):
Conclusion
SCX schedulers (sched_ext) give Arch Linux users a practical way to tune scheduling policy to their workload—whether your priority is desktop responsiveness, lower latency under load, or throughput for batch tasks. Start with a conservative scheduler, validate stability, enable it via scx_loader.service when available, and benchmark methodically before drawing conclusions.
Veröffentlichung von NEF-Filemanager
Heute habe ich meinen Filemanager, an dem ich seit einem Jahr arbeite, als Development Snapshot öffentlich gestellt. Ich hoffe, dass er auf Zustimmung trifft und weitere Entwickler zum Mitmachen begeistern kann.
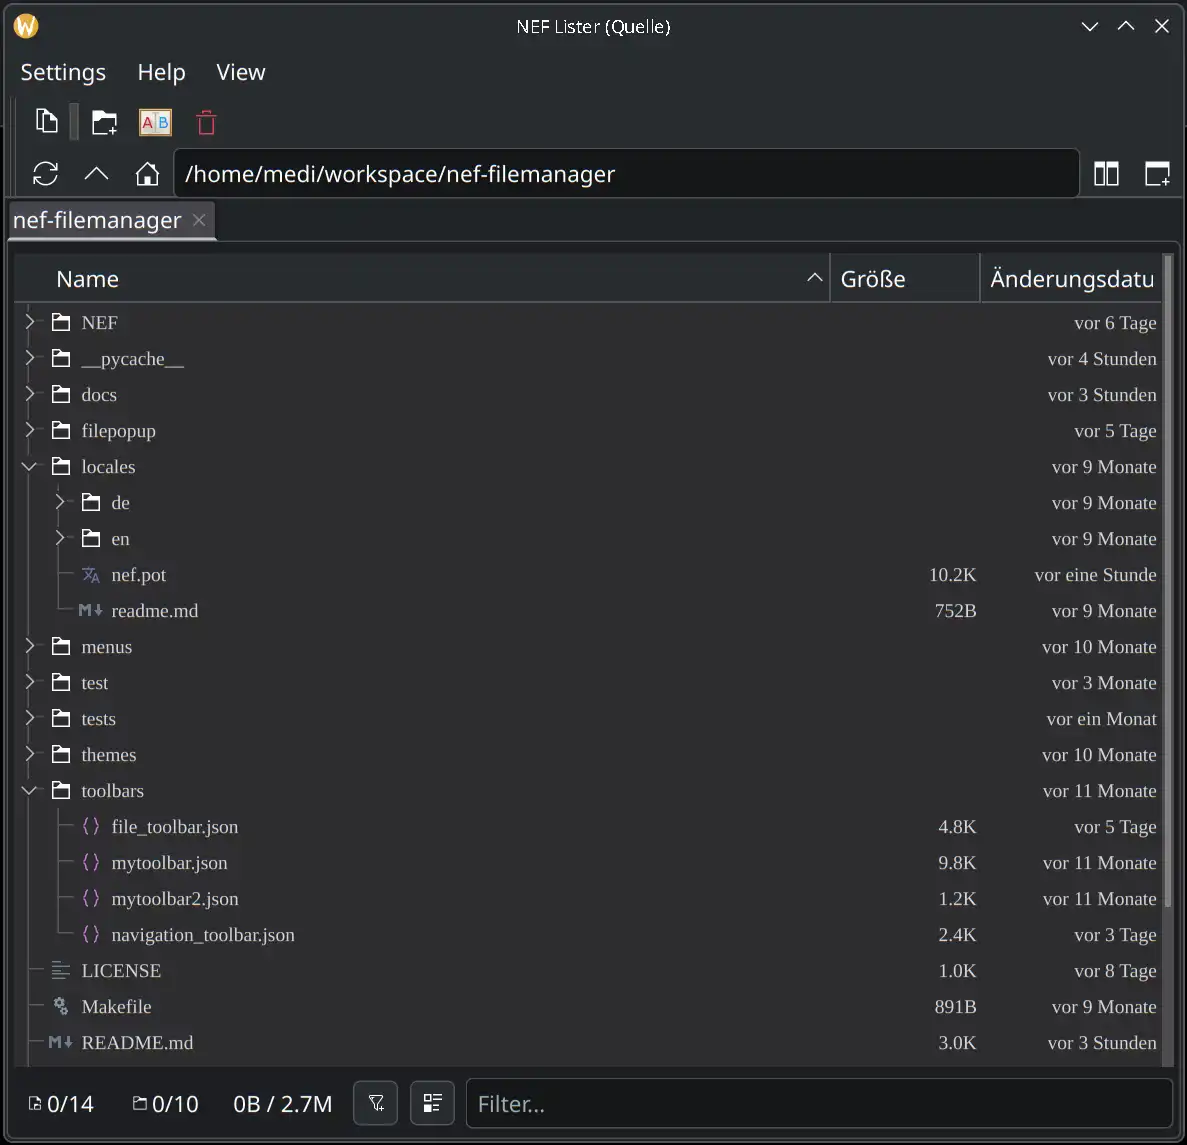
NEF bedeutet „Noch Ein Filemanager“ und ich habe ihn geschrieben, weil ich unter Linux einen Filemanager vermisse, den ich so gestalten kann, wie ich möchte, ohne einen zehnten Norton-Commander-Klon zu schaffen.
Er befindet sich noch im Alpha-Status, ist aber an sich schon gut benutzbar. Allerdings existiert noch kein „make install“ oder sonstige Desktop-Integration, aber das ist auch nur eine Frage der Zeit.
Wer ihn ausprobieren möchte, kann ihn gerne aus dem Git-Repository auschecken und starten. Die nötigen Schritte stehen in der README.
Viel Spaß beim Testen.
Screenshots
NEF-Filemanager Einzelansicht
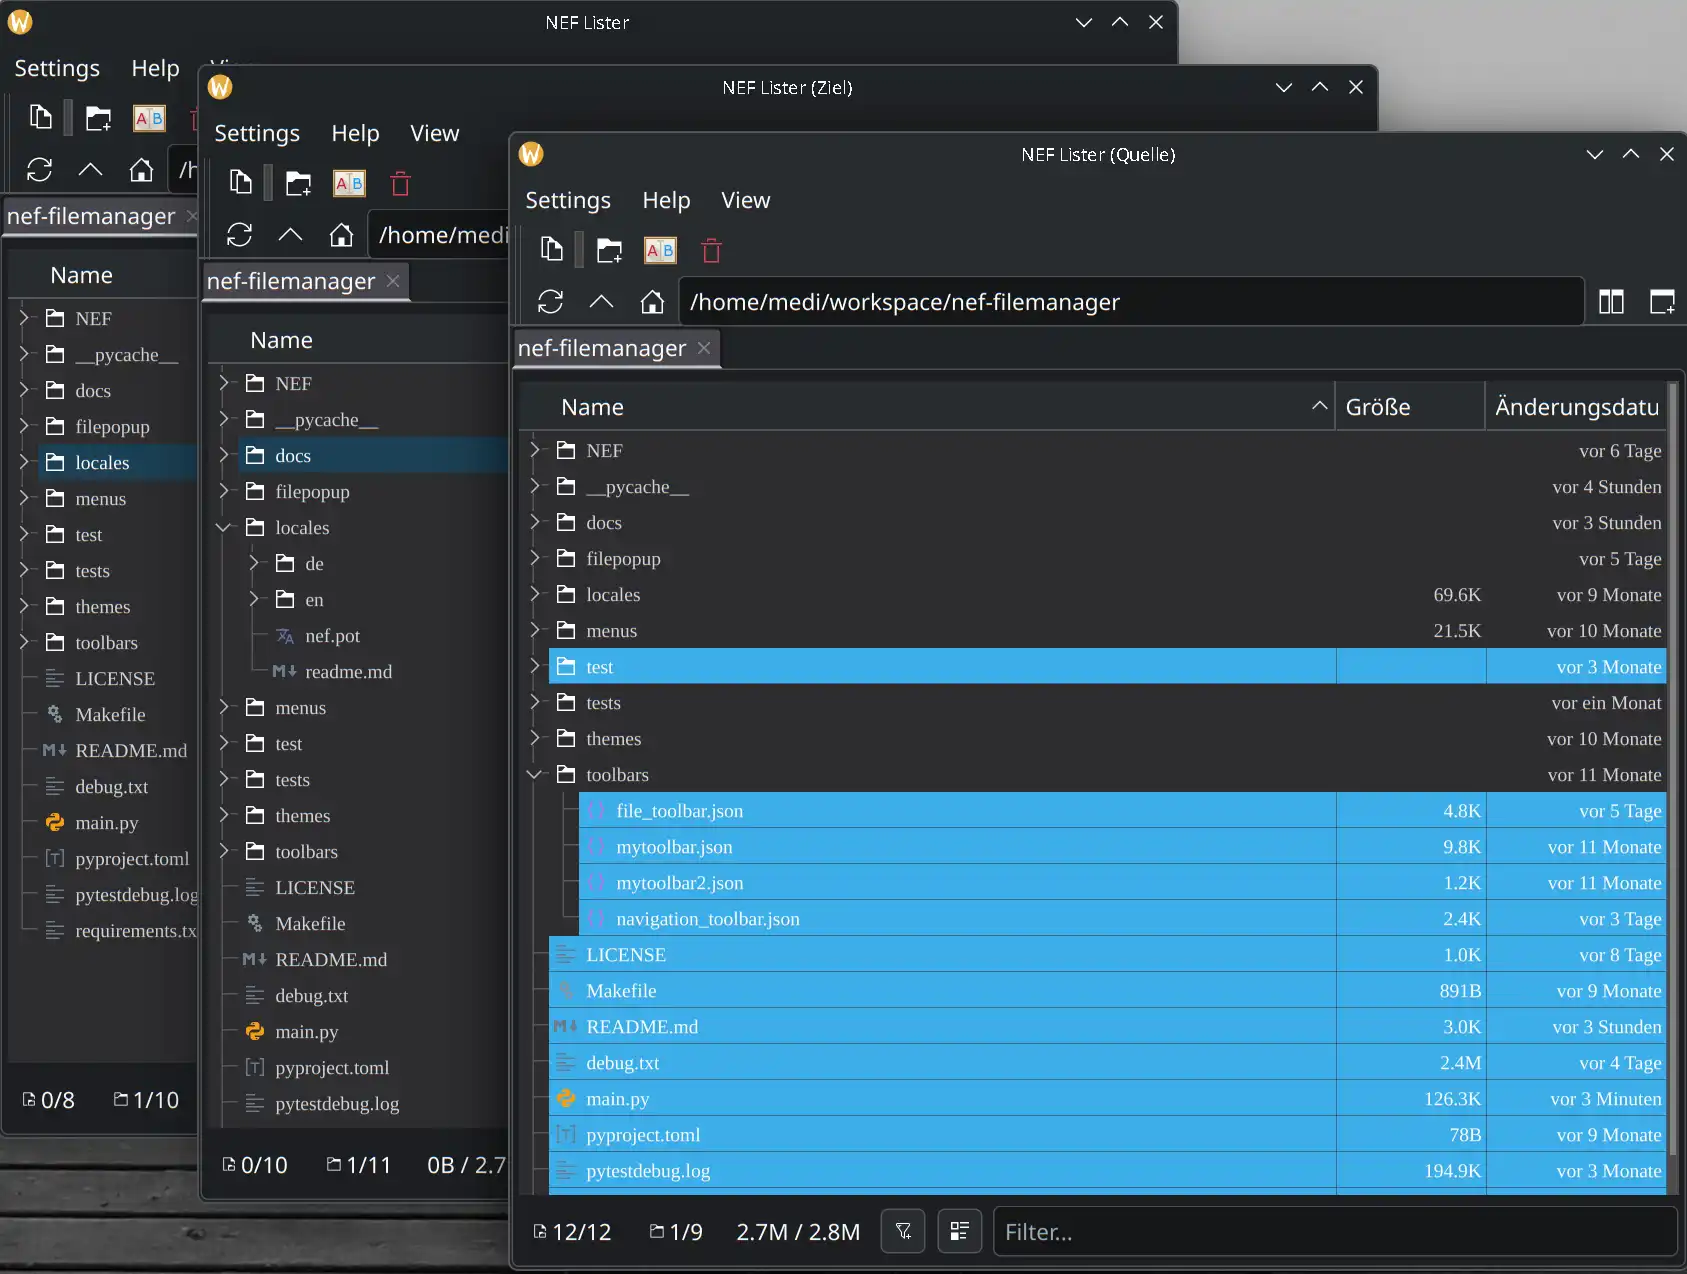
NEF-Filemanager Dual-Lister

NEF-Filemanager Multi-Lister
Links
PostgreSQL Version Migration on Arch Linux
After every major PostgreSQL update, you need to migrate the database to the new version. Fortunately, on Arch Linux, this process is quite smooth with these commands.
Workflow
Install Old PostgreSQL
yay postgresql-old-upgrade
Stop Server
systemctl stop postgresql
Upgrade as Root
# Get last DB version
cat /var/lib/postgres/data/PG_VERSION

# Move current data to olddata
mv /var/lib/postgres/data /var/lib/postgres/olddata
mkdir /var/lib/postgres/data /var/lib/postgres/tmp
chown postgres:postgres /var/lib/postgres/data /var/lib/postgres/tmp

# Initialize a new database as the postgres user and migrate the old data to the new database
su postgres
initdb -D /var/lib/postgres/data --locale=C.UTF-8 --encoding=UTF8 --data-checksums
# Replace PG_VERSION with the old version number from the first step
pg_upgrade -b /opt/pgsql-PG_VERSION/bin -B /usr/bin -d /var/lib/postgres/olddata -D /var/lib/postgres/data

# If you get the error: "old cluster does not use data checksums but the new one does", enter the following command and repeat pg_upgrade
pg_checksums --disable --pgdata /var/lib/postgres/data

exit # Exit your su session
Start Server
systemctl stop postgresql
Optimize
su postgres
/usr/bin/vacuumdb --all --analyze-in-stages --missing-stats-only
/usr/bin/vacuumdb --all --analyze-only
exit
Links
Setup Obsidian Self Hosting LiveSync
Ich suchte für eine Sync Lösung für meine Notizen und wurde bei Obsidian fündig. Obsidian hat einen Großen Pool an Add-ons und einer der Spannenden ist wohl LiveSync.
Zum aufsetzten, habe ich mich für die Self Hosting Version entschieden, bei der man eine Docker mit CouchDB aufsetzt und in meinem Fall hinter einen Nginx für https betreibt.
docker-compose.yml
Für den CouchDB docker habe ich mich für diesen entschieden docker-obsidian-livesync-couchdb und lege eine docker-compose.yml in einem Directory an was für die Daten der DB gedacht ist.
services:
  couchdb-obsidian-livesync:
    image: docker.io/oleduc/docker-obsidian-livesync-couchdb:master
    container_name: couchdb-obsidian-livesync
    restart: always
    environment:
      SERVER_URL: $example.domain
      COUCHDB_USER: myadminuser
      COUCHDB_PASSWORD: mytopsecretadminpw
      COUCHDB_DATABASE: obsidian
    ports:
      - "127.0.0.1:5984:5984"
    volumes:
      - "${LD_HOST_DATA_DIR:-./data}:/opt/couchdb/data"
Systemd service
Erzeugen eines Services der beim Reboot gestartet wird. Dazu legen wir das File oder Symlink nach /etc/systemd/system/obsidian-livesync-couchdb.service an.
[Unit]
Description=%p container

PartOf=docker.service
After=network.target docker.service
StartLimitIntervalSec=0

[Service]
Type=oneshot
RemainAfterExit=true
User=user
WorkingDirectory=/$dataLocationpath$/obsidian-livesync-couchdb/

ExecStart=/usr/bin/docker compose up -d --remove-orphans
ExecStop=/usr/bin/docker compose down

[Install]
WantedBy=multi-user.target
$dataLocationpath$ muss durch den Path ersetzt werden in dem das docker-compose.yml File liegt und in den unter /data die DB Daten liegen werden.
User=user ist der Service User unter dem die File rechte liegen und kann angepasst werden.
Starten des Services
systemctl start obsidian-livesync-couchdb.service
systemctl enable obsidian-livesync-couchdb.service
Nginx VHost
server {
    server_name $example.domain;


        root /dummy/default/root;

        # Add index.php to the list if you are using PHP
        index index.html index.htm;

    location / {
        proxy_set_header Host $host;
        proxy_set_header X-Real-IP $remote_addr;
        proxy_pass http://127.0.0.1:5984;
    }


    listen 80;
}
Let's Encrypt
Und nach dem nun noch das SSL Certificat mit Let's Encrypt
certbot --nginx -d $example.domain
Nun sollte man auf die DB zugreifen können die Url ist:
https://$example.domain/_utils
Die aktuell Config ist hier zu finden:
https://$example.domain/_node/_local/_config
DB Setup
Für das Setup der CouchDB gibt es ein init Script welsches die erste schritte übernimmt, wenn der Docker dies noch nicht von selber erledigt hatte.
export hostname=https://$example.domain
export username=myadminuser
export password=mytopsecretadminpw
curl -s https://raw.githubusercontent.com/vrtmrz/obsidian-livesync/main/utils/couchdb/couchdb-init.sh | bash
Setup-URI Generieren
Mit der Setup URI kann man den Server und die Obsedian APP Verheiraten damit man nicht alles Manuel eintragen muss. Zusätzliche env variable zu den obere von DB Setup.
export passphrase=enryptpassword
Erzeugen der Setup-URI
deno run -A https://raw.githubusercontent.com/vrtmrz/obsidian-livesync/main/utils/flyio/generate_setupuri.ts
Mit diesen Script bekommt man jetzt ein password und eine obsidian://setuplivesync?settings= welsche man in das Obsidian Add-on eingeben muss.
Obsidian Setup
Jetzt geht man bei Obsidian in Preference → Extrenal Add-ons, sucht dort nach Lifesync und installiert es.
Jetzt kann man die setuplivesync URI dort bei Optionen hinzufügen und wird nach dem Setup-URI Password gefragt und danach kommen ein wichtiges Setup Wizard, den man je nach Client richtig durchspielen muss, damit man ja nicht seine alten Daten verliert. Genau dasselbe muss man dann auch bei allen anderen Client durchspielen und aufpassen das man Merge verwendet um somit auf allen Clients denselben stand hat.
Viel Spaß
Links
Ältere Artikel:
- Install Exim4 mit Spamassassin, Dovecot auf Ubuntu 22.
- Raspberry Pi zu einem mini Server Konfigurieren
- Raspberry Pi einmal komplett upgraded
- Raspberry Pi WLAN Verbindungsprobleme mit neueren Router lösen
- OpenHAB auf einer Kodi Box als Docker Service installieren
- PI-hole auf einer Kodi Box als docker Service installieren
- Lazy Loading ist nun im Blog komplett implementiert
- Steam Deck zum Desktop Rechner machen
- Externe ports in das interne Netz Portforwarden
- Windows Imaging Component for HEIC file